JABS User Guide
The JABS Project Directory
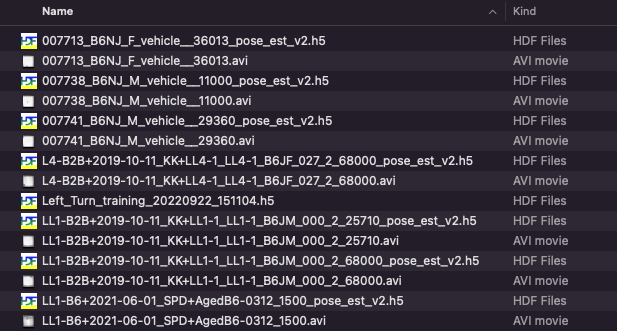
A JABS project is a directory of video files and their corresponding pose estimation files. The first time a project directory is opened in JABS, it will create a subdirectory called “jabs”, which contains various files created by JABS to save project state, including labels and current predictions.
Example JABS project directory listing:
Initializing A JABS Project Directory
The first time you open a project directory in with JABS it will create the “jabs” subdirectory. Features will be computed the first time the “Train” button is clicked. This can be very time consuming depending on the number and length of videos in the project directory.
The jabs-init command can also be used to initialize a project directory before it is opened in the JABS GUI. This script checks to make sure that a pose file exists for each video in the directory, and that the pose file and video have the same number of frames. Then, after these basic checks, the script will compute features for all of the videos in the project. Since jabs-init can compute features for multiple videos in parallel, it is significantly faster than doing so through the GUI during the training process.
jabs-init usage:
jabs-init [-h] [-f] [-p PROCESSES] [-w WINDOW*SIZE]

                                                       [\-\-force\-pixel\-distances]

                                                       project\_dir
positional arguments:

project_dir

optional arguments:

-h, --help            show this help message and exit

-f, --force           recompute features even if file already exists

-p PROCESSES, --processes PROCESSES

                                              number of multiprocessing workers

-w WINDOW_SIZE        Specify window sizes to use for computing window features. Argument can

                                              be repeated to specify multiple sizes (e.g. \-w 2 \-w 5). Size is number

                                              of frames before and after the current frame to include in the window.

                                              For example, '\-w 2' results in a window size of 5 (2 frames before, 2

                                              frames after, plus the current frame). If no window size is specified,

                                              a default of 5 will be used.

 --force-pixel-distances

                                              use pixel distances when computing features even if project supports cm
example jabs-init command
The following command runs the jabs-init script to compute features
using window sizes of 2, 5, and 10. The script will use up to 8 processes for
computing features (-p8). If no -p argument is passed, jabs-init
will use up to 4 processes.
The jabs Directory
JABS creates a subdirectory called “jabs” inside the project directory. This directory contains app-specific data such as project settings, generated features, user labels, cache files, and the latest predictions.
project.json This file contains project settings and metadata.
jabs/annotations
This directory stores the user’s labels, stored in one JSON file per labeled video.
jabs/archive
This directory contains archived labels. These are compressed files (gzip) containing labels for behaviors that the user has removed from the project. JABS only archives labels. Trained classifiers and predictions are deleted if a user removes a behavior from a project.
jabs/cache
Files cached by JABS to speed up performance. Some of these files may not be portable, so this directory should be deleted if a JABS project is copied to a different platform.
jabs/classifiers
This directory contains trained classifiers. Currently, these are stored in Python Pickle files and should be considered non-portable.
jabs/features
This directory contains the computed features. There is one directory per project video, and within each video directory there will be one feature directory per identity. Feature files are usually portable, but JABS may need to recompute the features if they were created with a different version of JABS.
jabs/predictions
This directory contains prediction files. There will be one subdirectory per behavior containing one prediction file per video. Prediction files are automatically opened and displayed by JABS if they exist. Prediction files are portable, and are the same format as the output of the command line classifier tool (jabs-classify).
GUI
Main Window
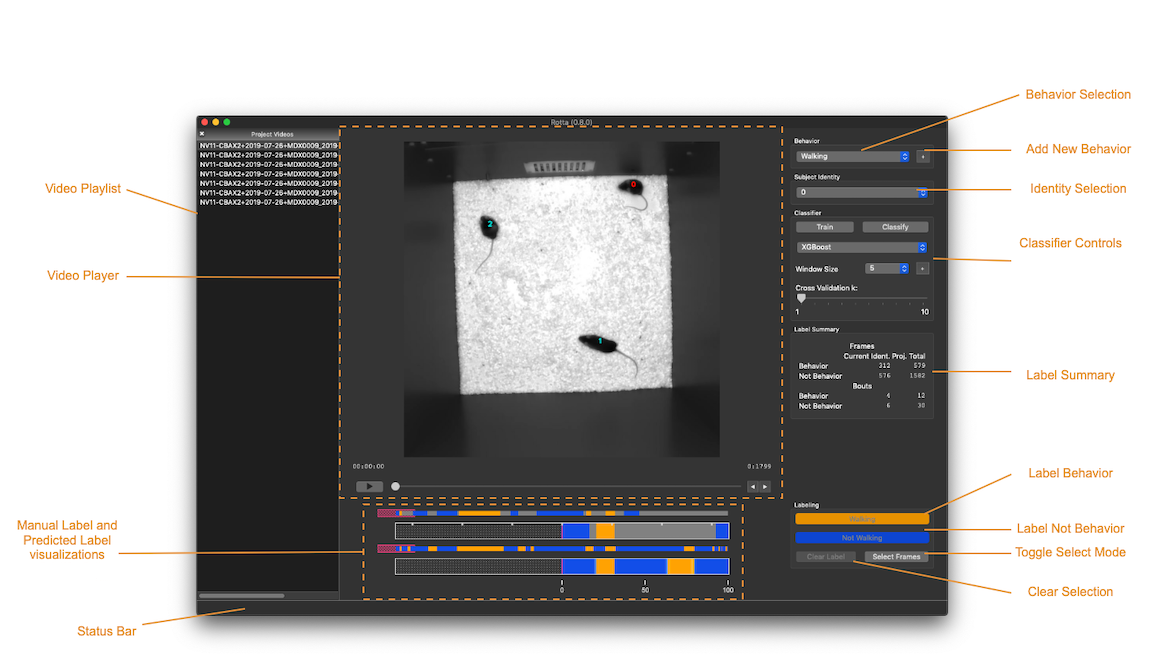
Behavior Selection: Select current behavior to label
Add New Behavior Button: Add new behavior label to project
Identity Selection: Select subject mouse to label (subject can also be selected by clicking on mouse in the video)
Classifier Controls: Configure and train classifier. Use trained classifier to infer classes for unlabeled frames. See “Classifier Controls”
section for more details.
Label Summary: Counts of labeled frames and bouts for the subject identity in the current video and across the whole project.
Label “Behavior” Button: Label current selection of frames as showing behavior. This button is labeled with the current behavior name.
Label “Not Behavior” Button: Label current selection of frames as not showing behavior This button is labeled with “Not <current behavior name>”.
Clear Selection Button: remove labels from current selection of frames
Toggle Select Mode Button: toggle select mode on/off (turning select mode on will begin selecting frames starting from that point)
Video Playlist: list of videos in the current project. Click a video name to make it the active video.
Video Player: Displays the current video. See “Video Player” section for more information.
Manual Label and Predicted Label Visualizations: see “Label Visualizations” for more information.
Status Bar: Displays periodic status messages.
Classifier Controls
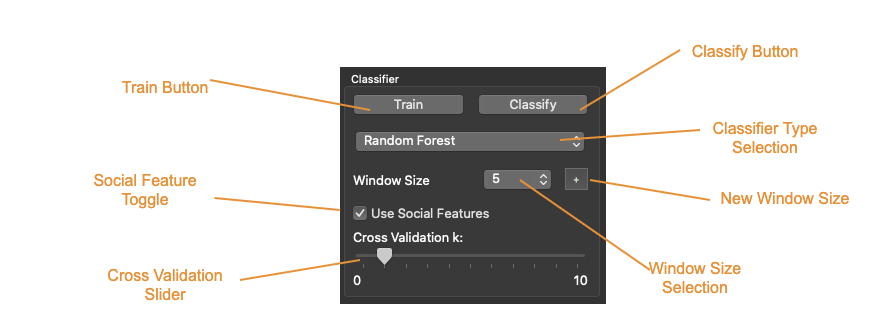
Train Button: Train the classifier with the current parameters. This button is disabled until minimum number of frames have been labeled for a
minimum number of mice (increasing the cross validation k parameter increases
the minimum number of labeled mice)
Classify Button: Infer class of unlabeled frames. Disabled until classifier is trained. Changing classifier parameters may require retraining
before the Classify button becomes active again.
Classifier Type Selection: Users can select from a list of supported classifiers.
Window Size Selection: Number of frames on each side of the current frame to include in window feature calculations for that frame. A “window size” of 5
means that 11 frames are included into the window feature calculations for
each frame (5 previous frames, current frame, 5 following frames).
New Window Size: Add a new window size to the project.
Cross Validation Slider: Number of “Leave One Out” cross validation iterations to run while training.
Social Feature Toggle: Turn on/off social features (disabled if project includes pose file version 2). Allows training a classifier backwards
compatible with V2 pose files using V3 or higher poses.
Label and Prediction Visualizations
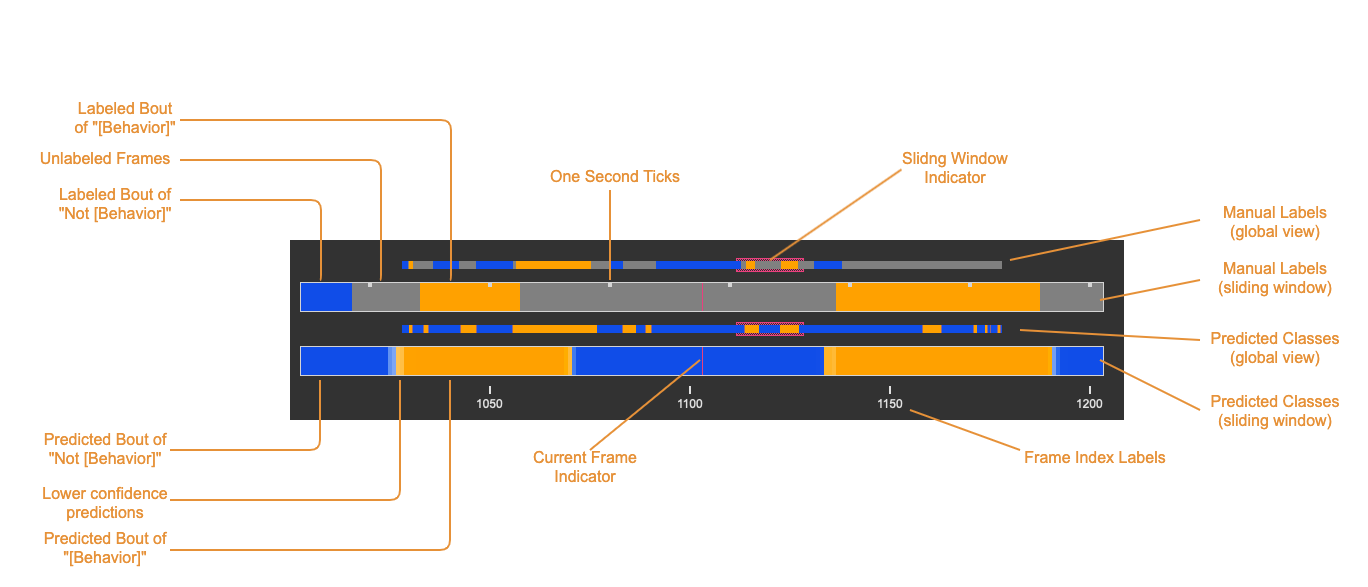
Manual Labels (sliding window): Displays manually assigned labels for a sliding window of frames. The window range is the current frame +/-50 frames.
Orange indicates frames labeled as showing the behavior, blue indicates frames
labeled as not showing the behavior. Unlabeled frames are colored gray.
Manual Labels (global view): Displays a zoomed out view of the manual labels for the entire video
Predicted Classes (sliding window): Displays predicted classes (if the classifier has been run). Color opacity indicates prediction probability for
the predicted class. Manually assigned labels are also displayed with
probability of 100%.
Predicted Class (global view): Displays a zoomed out view of the predicted classes for the entire video.
Sliding Window Indicator: highlights the section of the global views that correspond to the frames displayed in the “sliding window” views.s
Menu
JABS→About: Display About Dialog
JABS→User Guide: Display User Guide
JABS→Quit JABS: Quit Program
File→Open Project: Select a project directory to open. If a project is already opened, it will be closed and the newly selected project will be
opened.
File→Export Training Data: Create a file with the information needed to share a classifier. This exported file is written to the project directory and
has the form <Behavior*Name>*training*<YYYYMMDD*hhmmss>.h5. This file is
used as one input for the jabs-classify script.
View→View Playlist: can be used to hide/show video playlist
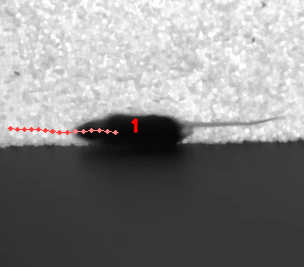
View→Show Track: show/hide track overlay for the subject. The track overlay shows the nose position for the previous 5 frames and the next 10
frames. The nose position for the next 10 frames is colored red, and the
previous 5 frames it is a shade of pink.
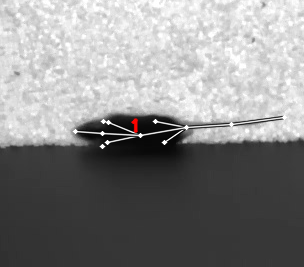
View→Overlay Pose: toggle the overlay of the pose on top of the subject mouse
View→Overlay Landmarks: toggle the overlay of arena landmarks over the video.
Track Overlay Example:
Pose Overlay Example:
Labeling
This section describes how a user can add or remove labels. Labels are always applied to the subject mouse and the current subject can be changed at any time. A common way to approach labeling is to scan through the video for the behavior of interest, and then when the behavior is observed select the mouse that is showing the behavior. Scan to the start of the behavior, and begin selecting frames. Scan to the end of the behavior to select all of the frames that belong to the bout, and click the label button.
Selecting Frames
When “Select Mode” is activated, JABS begins a new selection starting at that frame. The current selection is from the selection start frame through the current frame. Applying a label, or removing labels from the selection clears the current selection and leaves “Select Mode”.
The current selection range is shown on the “Manual Labels” display:

Clicking the “Select Frames” button again or pressing the Escape key will unselect the frames and leave select mode without making a change to the labels.
Applying Labels
The “Label Behavior Button” will mark all of the frames in the current selection
as showing the behavior. The “Label Not Behavior” button will mark all of the
frames in the current selection as not showing the behavior. Finally, the “Clear
Labels” button will remove all labels from the currently selected frames.
The “Label Behavior Button” will mark all of the frames in the current selection as showing the behavior. The “Label Not Behavior” button will mark all of the frames in the current selection as not showing the behavior. Finally, the “Clear Labels” button will remove all labels from the currently selected frames.
Keyboard Shortcuts
Using the keyboard controls can be the fastest way to label.
Labeling Controls
The z, x, and c keys can be used to apply labels.
If in select mode:
z: label current selection as “behavior”
x: clear labels from current selection
c: label current selection as “not behavior”
If not in select mode:
z, x, c: start selecting frames.
Identity Gaps
Identities can have gaps if the mouse becomes obstructed or the pose estimation
failed for those frames. In the manual label visualization, these gaps are
indicated with a pattern fill instead of the solid gray/orange/blue colors. In
the predicted class visualization, the gaps are colored white.

All Keyboard Shortcuts
Labeling
while in select mode:
z: label current selection <behavior>and leave select mode
x: clear current selection labels and leave select mode
c: label current selection not <behavior> and leave select mode
Escape: exit select mode without applying/clearing labels for current selection
while not in select mode:
z, x, c: enter select mode
Other
t: toggle track overlay for subject
p: toggle pose overlay for subject
l: toggle landmark overlay
The Command Line Classifier
JABS includes a script called jabs-classify, which can be used to classify a
single video from the command line.
usage: jabs-classify COMMAND COMMAND_ARGS

commands:

classify   classify a pose file

train      train a classifier that can be used to classify multiple pose files

See `jabs-classify COMMAND --help` for information on a specific command.
 usage: jabs-classify classify [-h] [--random-forest | --gradient-boosting | --xgboost]

                                                       (\-\-training TRAINING | \-\-classifier CLASSIFIER) \-\-input\-pose

                                                       INPUT\_POSE \-\-out\-dir OUT\_DIR [\-\-fps FPS]

                                                       [\-\-feature\-dir FEATURE\_DIR]

 optional arguments:

   -h, --help            show this help message and exit

   --fps FPS             frames per second, default=30

   --feature-dir FEATURE_DIR

                                                 Feature cache dir. If present, look here for features before computing.

                                                 If features need to be computed, they will be saved here.

 required arguments:

   --input-pose INPUT_POSE

                                               input HDF5 pose file (v2, v3, or v4).

   --out-dir OUT_DIR     directory to store classification output

 optionally override the classifier specified in the training file:

Ignored if trained classifier passed with --classifier option.

(the following options are mutually exclusive):

 --random-forest       Use Random Forest

 --gradient-boosting   Use Gradient Boosting

 --xgboost             Use XGBoost
Classifier Input (one of the following is required):
- --training TRAINING
Training data h5 file exported from JABS
—classifier CLASSIFIER
Classifier file produced from the jabs-classify train command
usage: jabs-classify train [-h] [--random-forest | --gradient-boosting | --xgboost]

                                               training\_file out\_file

positional arguments:

  training_file        Training h5 file exported by JABS

  out_file             output filename

optional arguments:

  -h, --help           show this help message and exit

optionally override the classifier specified in the training file:

 (the following options are mutually exclusive):

  --random-forest      Use Random Forest

  --gradient-boosting  Use Gradient Boosting

  --xgboost            Use XGBoost
Note: xgboost may be unavailable on Mac OS if libomp is not installed.
See jabs-classify classify –help output for list of classifiers supported in
the current execution environment.
Note: fps parameter is used to specify the frames per second (used for scaling
time unit for speed and velocity features from “per frame” to “per second”).
File Formats
This section documents the format of JABS output files that may be needed for
downstream analysis.
Inference File
An inference file represents the predicted classes for each identity present in one video file.
Location
The prediction files are saved in <JABS project dir>/jabs/predictions/<behavior*name>/<video*name>.h5 if they were generated by the JABS GUI. The jabs-classify script saves inference
files in <out-dir>/<behavior*name>/<video*name>.h5
Contents
The H5 file contains one group, called “predictions”. This group contains three
datasets
predictions
predicted_class
probabilities
identity_to_track
The file also has some attributes:
version: This attribute contains an integer version number, and will be incremented if an incompatible change is made to the file format.
source*pose*major_version: integer containing the major version of the pose file that was used for the prediction
predicted_class
dtype: 8-bit integer
shape: #identities x #frames
This dataset contains the predicted class. Each element contains one of three
values:
0: “not behavior”
1: “behavior”
-1: “identity not present in frame”.
probabilities
dtype: 32-bit floating point
shape: #identities x #frames
This dataset contains the probability (0.0-1.0) of each prediction. If there is no prediction (the identity doesn’t exist at a given frame) then the prediction probability is 0.0.
identity_to_track
dtype: 32-bit integer
shape: #identities x #frames
This dataset maps each JABS-assigned identity (Pose version 3) back to the original track ID from the pose file at each frame. -1 indicates the identity does not map to a track for that frame. For Pose File Version 4 and greater, JABS uses the identity assignment contained in the pose file. For pose version 2, there will be exactly one identity (0).